In this two part post, I’d like to focus on some Volume Surface functionality enhancements that we recently added in ProjectExplorer v4.0.3. However, before we dive in – let’s step back and explore how these new tools originally came about.
We were contacted a few weeks ago (just after Autodesk University 2017) by a ProjectExplorer user based in The Netherlands. He wanted to include a cut/fill summary for volume surfaces in outgoing reports from Civil 3D and wondered if he could achieve this with ProjectExplorer. At the time, we didn’t have this feature in the product so we embarked on a fairly lengthy back and forth e-mail exchange to flesh out how this might look in the product.
What did we set out to achieve?
As is often the case when discussing potential functionality enhancements with our customers, over the next couple of weeks the plan went through a process of evolution and eventually grew into something far more useful. We eventually arrived at a plan to implement a package of new features for Civil 3D users working with surfaces.
- Introduce support for selecting multiple surfaces in the ProjectExplorer window to allow surface styles and other parameters to be simultaneously applied to more than one Civil 3D surface.
- Allow the values in the cut/fill factor columns for volume surfaces to be double-clicked and edited.
- Allow customisable volume surface summaries to be included in the report footer of outgoing reports and spreadsheets.
- Display a dynamic (and customisable) volume surface summary in the ProjectExplorer window. This would need to work in two alternative modes: either to summarise the total cut/fill volume of all volume surfaces in the drawing, or alternatively to summarize the total cut/fill volume of any currently selected volume surfaces.
If this sounds interesting, read on to learn what we did to address these aims, and how to use the new functionality.
So what’s new?
First of all, you can now select multiple surfaces in the surface list. In fact, as we looked back through our feedback archives – this turned out to be the most requested feature enhancement up to this point. As we were about to embark on some surface enhancements, it made sense to implement it in this package of work.
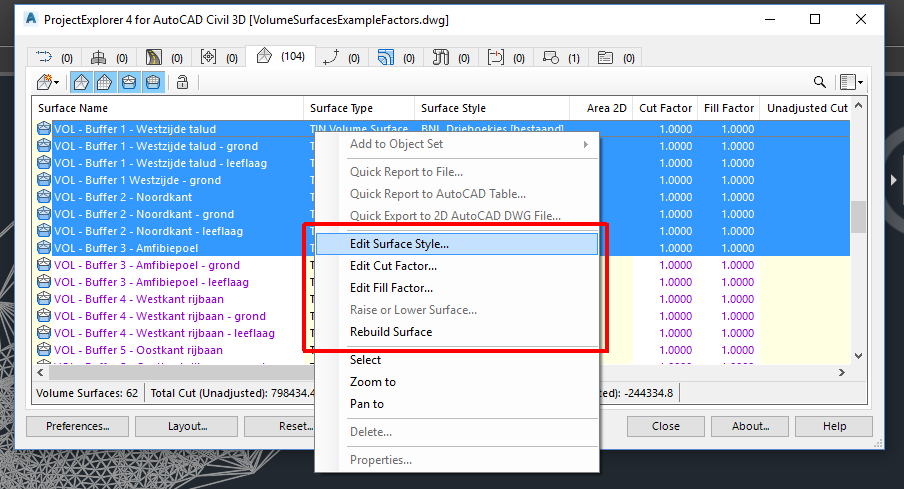
The beauty of this feature is that you can now carry out a range of operations to as many surfaces as you like – in a single operation. These operations are accessed from the right-click menu and include things like zoom to, pan to, change the surface style, rebuild the surface, raise/lower the surface, and edit cut/fill factors. We like this multiple object selection feature so much, that we plan to roll it out to point groups, site feature lines, and parcels next – so watch this space…
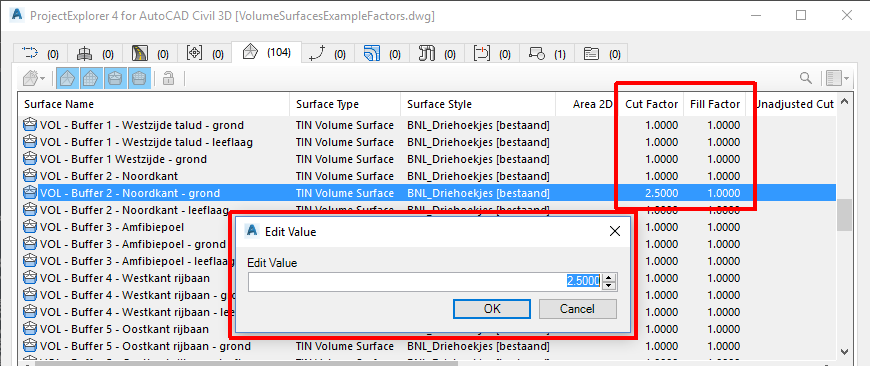
As well as those right-click menu options for editing objects in ProjectExplorer, many parameters can be edited by directly double-clicking them in the ProjectExplorer window. There is a fair bit of work for us to individually expose each parameter for editing in the product and as a result – we sometimes miss the odd one or don’t consider some of them important enough to expose. This was previously the case for the cut/fill factor parameters for Volume Surfaces, but from v4.0.3 onwards I’m happy to report that these are now directly editable:
Didn’t you mention something about Volume Surface Summaries?
Indeed I did – and in two places: the ProjectExplorer window, and in outgoing reports and spreadsheets. Let’s deal with the ProjectExplorer window first.

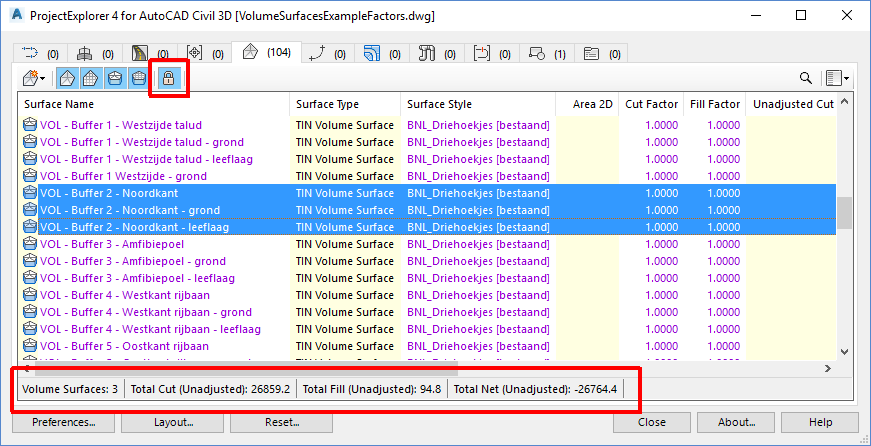
If you take a look at the screenshot above, you’ll notice two new items in the ProjectExplorer Surfaces tab. First of all, we have added a new status bar along the bottom edge of the surfaces list. This is where you’ll see the new total cut/fill factor summary. The content of this status bar works in two modes depending on the state of the new lock/unlock icon in the Surfaces toolbar shown above.
- When the icon is locked, the volume surface summary calculations are limited to whatever volume surfaces are currently selected. If any other surface types are included in the current selection, these are ignored in the calculations.
- When the icon is unlocked, the volume surface summary is based on all surfaces in the list regardless of the current selection. This is shown below.
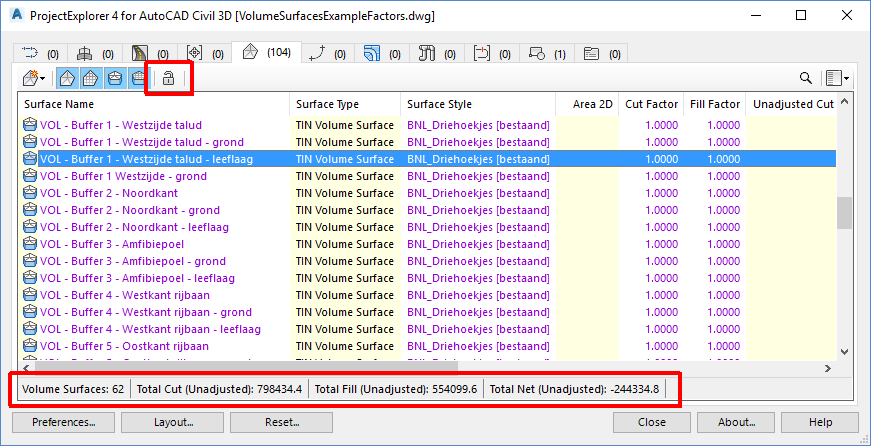
It probably goes without saying that all content in the new status bar is updated dynamically if you modify your Civil 3D design, which is a great way to validate or keep a constant eye on your total cut/fill volumes.
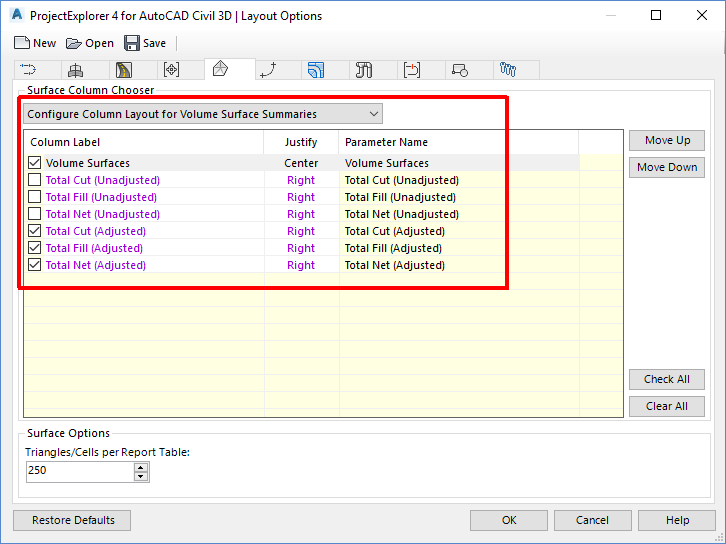
I mentioned earlier that the new status bar can be customised. This is achieved in the same way as customising the layout of other parts of the ProjectExplorer window – by editing the Layout Style which is currently assigned to the ProjectExplorer window. To do this, hit the Layout… button in the lower left corner of the window. The Layout Options window will open.

In the drop-down on the Surfaces tab, you’ll see a new option labelled Configure Column Layout for Volume Surface Summaries. Selecting that will display a list of fields which can be displayed in the Volume Surface Summary status bar:
How would I include a Volume Surface summary in a report or spreadsheet?
Putting a Volume Surface summary into a report requires the use of the aforementioned Layout Style options and a corresponding option which we’ve added to Report Styles. We’ll tackle this subject in Part 2 of this article which will be up next.