ProjectExplorer 5 for Autodesk Civil 3D
Installation & Licensing Guide | Floating Network (NLM) License
Floating Network (NLM) License
Step 3 - Configure the License Configuration Tool
The License Configuration Tool allows ProjectExplorer for Autodesk Civil 3D to be easily switched between standalone (local) licensing mode and floating network licensing mode.
Setting ProjectExplorer to Floating Network Licensing Mode
To use a floating network license, use the License Configuration Tool to specify the network location and communication port for the previously installed Network License Service. If the License Configuration Tool is not installed, ProjectExplorer will default to standalone (local) licensing mode.
Open Windows Explorer, and navigate to the folder in which you installed the License Configuration Tool.
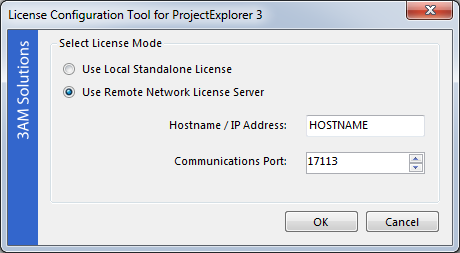
Right-click the executable file "CVX.LicenseConfigTool.v3.exe", and select "Run as administrator" from the pop up menu. The License Configuration Tool will open.
Select "Use Remote Network License Server", then specify the hostname or IP address of your license server and the communication port that your Network License Service has been configured to use (the default port is 17113). Check that the specified port is not being blocked by firewall software on either the license client or the license server.
Next Step